Saturday, June 25, 2011

Android adb “Unable to open sync connection!”

This happens sometimes on eclipse (or you can also experience with working on adb commandline). Unfortunately, the best known solution so far is to:
  1. Unplug the USB cable.
  2. Disable the USB debugging mode on the phone, and re-enable it.
  3. Then re-plug the USB cable!

Courtesy: StackOverflow.

Friday, June 24, 2011

Using LG Optimus 2X under USB debugging mode on Ubuntu

If you want to develop/debug applications or even connect ddms/adb to your LG-O2X, you need to setup udev rules, in order for it to be detected by the OS. I'm assuming here that you have already installed android SDK for this purpose, if not please do so (google it!) before proceeding.

In order to do this, at first you need to open a terminal Applications->Accessories->Terminal. Then type in the following commands into your terminal. As soon as you enter the command below, you might be prompted for your password. Enter it to proceed with privileged access.
    gksudo gedit /etc/udev/rules.d/90-android.rules

In the text editor which opens, enter the following line:
BUS=="usb", SYSFS{idVendor}=="1004", OWNER="<userName>", GROUP="<groupName>"
Where: 
1. <userName> is your user name on this machine. Yes! this means that this setting only works you alone! 
2. <groupName> is the name of the group you belong to on this machine. 
3. 1004 is the vendor ID of LG (Courtesy: theandroidphone) 
4. (Google on how to get your username and groupname if you don't know!)

Save and close this file. Then type the following command on your terminal:
    gksudo service udev restart

After this is done, plug-in the USB cable of your phone (if it's already plugged in, remove and re-plug) and in your phone enable USB debugging by: Settings->Applications->Development->USB debugging.

Then type the following command to make sure your phone is getting detected:
    adb devices
You should see something like below in the terminal:
List of devices attached
XXXXXXXXXXXXXXXX    device

PS: All this information is from my PC running Ubuntu-10.10 (the Maverick Meerkat).
Tuesday, June 21, 2011

Installing Cyanogenmod7 (Gingerbread build) on LG Optimus 2X

Even though the guidelines to do so are described nicely in the CyanogenMod wiki, there are small things this wiki forgets to mention, which caused me a lot of pain when I followed the steps mentioned in them. This blog is an attempt to make the process of installing cyanogenmod as smooth as possible. These were the steps I followed on my O2X (LG Optimus 2X) to successfully install Cyanogenmod ROM.


Step0. Terminology:
If you are new to the world of android-hacking or new to android, in general, make sure that you are familiar the terminologies mentioned in this wiki.


Step1. Pre-requisites:
Do make sure that you satisfy all these before proceeding!
  1. Make sure that you have atleast 50% (to be on safer side, 75% :D) of battery charge remaining. This is highly important! If a low battery shuts down the installation process, then there's a very high chance that you are going to brick your phone!
  2.  The Recovery Mode somehow doesn't mount the internal sd-card of your phone. So, you have to make sure that you have another external sd-card plugged-in of atleast 2GB in size (on a safer side).
  3. If you have data like contacts, sms, call-log and such other stuffs, now's the time to get a backup of them (onto sd-card). Titanium Backup is a nice app for this purpose. Basically, all of the data on phone will be wiped-clean during this process. So, backup all those things on your phone, which you feel is important to you.
  4. You need to download/install all of these tools/files on your PC, before proceeding further: (This tutorial assumes that you are working on a PC with Windows-OS running on it)
    1. Install ADB. There's a very nice tutorial on how to install this tool. I recommend you to go through this link for more details. (Please do NOT perform the step4 mentioned the above tutorial link).
    2. Download busybox: Download this zip and extract its contents.
    3. Download psneuter: Download this zip and extract its contents.
    4. Download Superuser apk: Download this apk file onto your PC.
    5. LG USB drivers (v3.2.1): Download this exe and install it to your PC.
    6. It will be handy if you can extract the contents of all the zip files above into a single directory.
  5. Install ROM Manager on your phone: This is a very useful tool in booting to recovery mode and then installing ROM's of your choice.
  6. CyanogenMod ROM: Go to this link and download the latest nightly OR if you want to play safe, you can download the nightly numbered 53, because that's the one I downloaded and it works fine for me :). Download it to your pc and then transfer to over to your phone's sdcard. DO remember to store this zip file in the root of your external-sdcard and name it as update.zip!
  7. Google Apps: Default cyanogenmod ROMs do not have any google apps installed on them, so you would have to install them by yourself. You can download the zip file from here and then transfer it to the root of your external-sdcard and let's say that you name it as google.zip.
One small thing before you proceed, as soon as you boot into recovery mode, your phone goes into an eternal vibration mode. Don't panic. It's a bug in recovery mode and it will not affect the installation process.

Step2. Rooting:
You need to root the phone prior to installing cyanogenmod. Here are the steps you need to follow for this: (In step4, the commands appearing the first indentation level are the ones you will be typing on the command prompt and the ones in the second indentation level are the ones you will type inside the shell opened by 'adb'.)
  1. In your phone, enable 'USB Debugging': Settings->Applications->Development->USB Debugging.
  2. Connect your phone to this PC via USB cable.
  3. On your PC, open command prompt and 'cd' into the directory where you had extracted all the files from the zip files downloaded.
  4. In the command prompt type the the following commands:
    1. adb push busybox /data/local/
    2. adb push psneuter /data/local/
    3. adb push su /data/local/
    4. adb shell chmod 777 /data/local/busybox
    5. adb shell chmod 777 /data/local/psneuter
    6. adb shell
      1. /data/local/psneuter
    7. adb shell
      1. mount -o remount,rw -t ext3 /dev/block/mmcblk0p25 /system
      2. mkdir /system/xbin
      3. /data/local/busybox cp /data/local/su /system/xbin/su
      4. chown 0:0 /system/xbin/su
      5. chmod 6755 /system/xbin/su
      6. ln -s /system/xbin/su /system/bin/su
      7. exit
    8. adb push Superuser.apk /system/app/Superuser.apk
  5. Reboot.
  6. Your phone has been rooted.

Step3. Installing Cyanogenmod:
Note that when you are in recovery mode, you should use the volume up/down buttons to navigate the options on the screen. In order to select an option, press the power button.
  1. Open the 'ROM Manager' application on your phone.
  2. Tap on 'Flash ClockworkMod Recovery'.
  3. Select LG Optimus 2X in the menu that pops up.
  4. You will get a 'Superuser Request' prompt. Select 'Remember' and then 'Allow'.
  5. As soon as the flash is complete, you'll see a 'Successfully flashed ClockworkMod Recovery!' dialog box. Tap OK.
  6. ClockworkMod Recovery should be installed on your phone.
  7. Tap on 'Backup Current ROM' in order to backup your current ROM (which is, in most cases, the manufacturer supplied, stock ROM).
  8. 'Reboot into Recovery'.
  9. Select the option 'Wipe data/factory reset'.
  10. Select the option 'Wipe cache partition'.
  11. Select the option 'install zip from sdcard' and then select 'apply /sdcard/update.zip'.
  12. Select the option 'reboot system now'. 
  13. Now, your phone should boot into the Cyanogenmod ROM!
After this, if, you need to install the google-apps using google.zip:
  1. Open the 'ROM Manager' and select 'Reboot into Recovery'.
  2. Select the option 'install zip from sdcard' and then select 'choose zip from sdcard'.
  3. Select the 'google.zip'.
  4. Now, after your phone boots up, you'll be taken through series of asking you to confirm what are all the apps you want to be installed. Select the ones you need and you're done!

Lemme know how the info in this blog worked for you! Feedback on whether this content was useful to you would also help. : )

Happy modding!

Java API for Bitly webservice

I wrote a Java API for Bitly webservice (details about this webservice can be found here). It provides a easy interface to the output of the webservice, by parsing the JSON format and storing the values in the corresponding variables inside an appropriate 'BitlyResponse' object. This could be a very useful API for accessing url-shortening services from inside java apps (could be for android as well!). You can find the jar file and the relevant code at the following github repo: git@github.com:teju85/BitlyAPI.git

PS: There's no restriction on the using this library, provided you acknowledge the use of this API in your application. :)

Friday, June 17, 2011

CorrDim: a fast correlation dimension evaluator

After going through this blog written by Bill Maier, I thought why not I give a shot in writing a C++ program to find the correlation dimension and figure out its performance. 'CorrDim' is the result of this. This has some of the most common maps already available within the project folder viz: Logistic map, Tent map and Henon map. Also, adding a map of your choice is a piece of cake, thanks to virtual inheritance. Go through the 'README' file available in the source code to know more on how build and extend this to include more maps. This program supports 2 modes of correlation dimension evaluation:
  1. Fast but huge memory: In this mode, the distance matrix will be evaluated apriori so that the subsequent lookups are faster. However, this requires huge memory, especially if the number of elements considered is huge.
  2. 'Relatively' fast but consumes little memory: In this mode, the distance matrix will be evaluated on-the-fly, during the evaluation of the correlation dimension, thus requiring very little memory.
The choice of the mode depends on: If you absolutely cannot sacrifice even a little performance, then you should use the normal version. But for all practical purposes, it is recommended that you use the low-memory version.

Profiling:
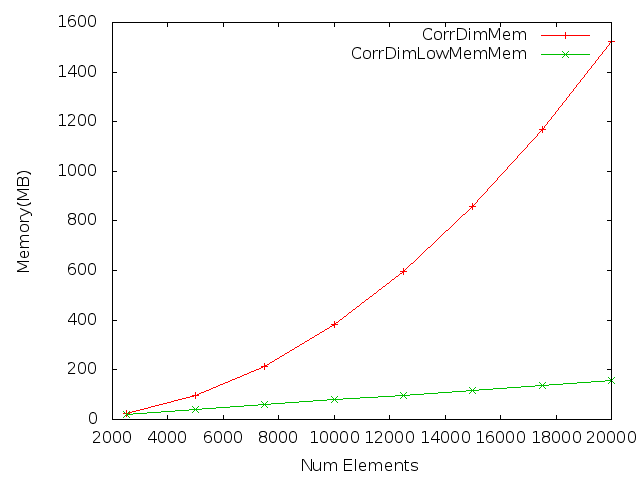
Here are the results from profiling this program [Results are on a Dell-Latitude E6400, with Ubuntu 10.10 installed and on LogisticMap.]...

Memory Profiling:

Run-time profiling:

As you can see, the LowMemory version of this program gives a significant reduction in memory footprint compared to its counterpart. At the same time, the performance loss is also not that noticeable.

I have hosted this project (open-source'd with GPL) on github at: git@github.com:teju85/CorrDim.git.

Wednesday, June 8, 2011

Replacing tabs with spaces in eclipse

Tabs are evil! They are interpreted differently by different editors. So, it is always better to setup your editor to replace tabs with a constant number of spaces. IMO, 4 spaces will be visually appealing. While working with eclipse, here's how to set this property: (assuming eclipse version "Helios Service Release 2")
Window -> Preferences -> Java -> Code Style -> Formatter -> New
Give your profile a name, something like 'Eclipse [only-spaces]' and inherit all the basic settings from the 'Eclipse [built-in]' profile. (You can choose to inherit from whichever other profile of your interest or you can directly edit one of your favorite profiles. For me, the built-in profile was sufficient). Also make sure that 'Open the edit dialog now' is checked in and then press 'Ok'.
In the dialog box which opens, select Indentation -> Tab policy -> Spaces only.
Set the 'Indentation size' and 'Tab size' to 4. (meaning 4 spaces, as I mentioned in the beginning).
Press Apply to save all your settings and from here onwards, eclipse will put spaces instead of tabs for the indentation!

The reason I created a new profile is because one can keep re-using this in all your future projects and also has the ability to export your profiles when you want to use this profile on some other machine!

Monday, June 6, 2011

Neat trick to replace spaces with any other character in Makefile

Sometimes, you would want to replace spaces in a string with another character (for this post let's assume that this character is a colon ':'. You can replace it with whatever replacement string you desire). The following makefile trick serves this purpose:
null      :=
SPACE     := $(null) $(null)
WITHSPACE := A string with spaces
REPLACED  := $(subst $(SPACE),:,$(WITHSPACE))
default:
 @echo WITHSPACE = $(WITHSPACE)
 @echo REPLACED = $(REPLACED)
And here's the output:
$ make
WITHSPACE = A string with spaces
REPLACED = A:string:with:spaces

Sunday, June 5, 2011

Accessing linux ext file-systems on win7

If you want to access only 'ext2' file systems:
'ext2ifs' is a very cool program to access the linux ext2 file-systems from windows. However, this works only on winXP or Vista, but not on Win7. No problem! win7 supports a compatibility mode where one can the programs on XP or Vista. To do so, right click on the exe of your interest (which you want to run under compatibility mode) -> Properties -> Compatibility. Check the box 'Run this program in compatibility mode for:' and select the windows version. After this, click 'Apply' to save your changes and you are done! The next time you run this exe, it'll automatically run under the mode for the appropriate windows version you selected above.

If you want to access an 'ext3/4' file systems: (read-only access)
There's a nice utility called linux-reader. This can provide read-only access to ext2/3/4, HFS and RaiserFS file systems! But, as mentioned above, it provided read-only access.

If you want to access an 'ext3' file system (both read/write access)
Utility called 'ext2fsd' is a solution for this case. However you have to install this exe and run it as administrator. To do so: right click on the exe to run -> 'Run as administrator'. This is an awesome utility and a plus point about it is that it doesn't require it's own explorer unlike the 'linux-reader' utility! Once you have assigned a drive letter to the volume of your interest, you can directly access them using the windows native explorer!